Tuesday, June 15, 2010

Shower Repairs


The outside shower is being replaced. We removed all the decking and plumbing to make way for the new shower design....(see our precision drawings below). I spend so much time drawing this stuff on napkins during my lunch break that CADD drawings have been replaced with site sketches on plywood panels. The outside shower is one of the most important items in this renovation and we all look forward to having it back!

The Rear Window

We finally finished most of the trim on the rear window and the colored panels have been installed. Most of the day was spent cutting small pieces of trim and staining them prior to installation.


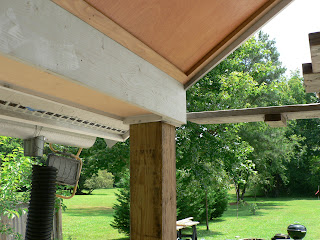
Back Porch Ceiling

Glen came back last weekend to help us with the back porch ceiling. As usual, he did a fantastic job putting it all together. We used the same plywood panels found on the interior ceiling. I spent the night before they arrived pulling the sub base off the ceiling and removing all the bird nests. PETA would have a fit, but I won't tell if you don't!

The Back Deck

Back outside again to finish the deck. We are using recycled flooring from an old furniture factory. The boards are about 3 1/2" thick and vary in length from 4' to 13' long. This ended up being a lot of work so I hope it works out. I don't know how I would ever price this if I had to do it again! There is something to be said for standardized lumber......


Meanwhile, Pam was hard at work on the brick path that will connect the driveway to the deck. These are the bricks we have been collecting from all over town and most have been used at least once before on the house. We seem to just keep pulling them up and re-using them.

Finishing the Floor


The interface between the old wood floor and the concrete will be slate tiles. These had to be cut to fit along the line of the old exterior wall.

Staining the Floor


Once we had our mixture set we applied the stain. We ended up applying the stain in two coats. The first coat set the color and the second coat was used to even out some of the variations. We polished the concrete prior to applying the stain but the porosity of the floor created quite a bit of variation.
After the stain set up we applied the neutralizer. When the surface was ready we applied the sealer and headed for the hills! One thing is for sure... the smell is strong! It was a good night to go visit the grandparents.

The Wall Comes Down!

The temporary partition in our living room was up for about 6 months. Our little 850 square foot house was reduced to about 450 sf for most of the winter. For the first time we are getting as sense of what the finished house will look and feel like. We had a few friends over to help us remove the remaining studs, share a few drinks and mess up our messy little house..... big day today! Next up on the agenda will be the concrete floors.


The concrete has to be cleaned several times prior to applying the stain. We are using a black (Ebony) colored acid stain that will be diluted to about 25% of its full strength. We started with a small sample area in the corner to determine this mixture.